The Nintendo 64 had interesting triangles. Instead of using 3 points to render one, you use 3 x values, 3 y values, and 3 slopes. And you might ask, if you’re going to use enough space for 3 points, why not just use the vertex way of rendering we’re used to? It’s faster for hardware to use slopes. However they are developer-unfriendly (and the Nintendo 64 was known for being developer-unfriendly for this, amongst other reasons) and they use RSP time to calculate the slopes. On the other hand, they can render shapes other than triangles. For example, if you set the slopes to 0, you get a rectangle:
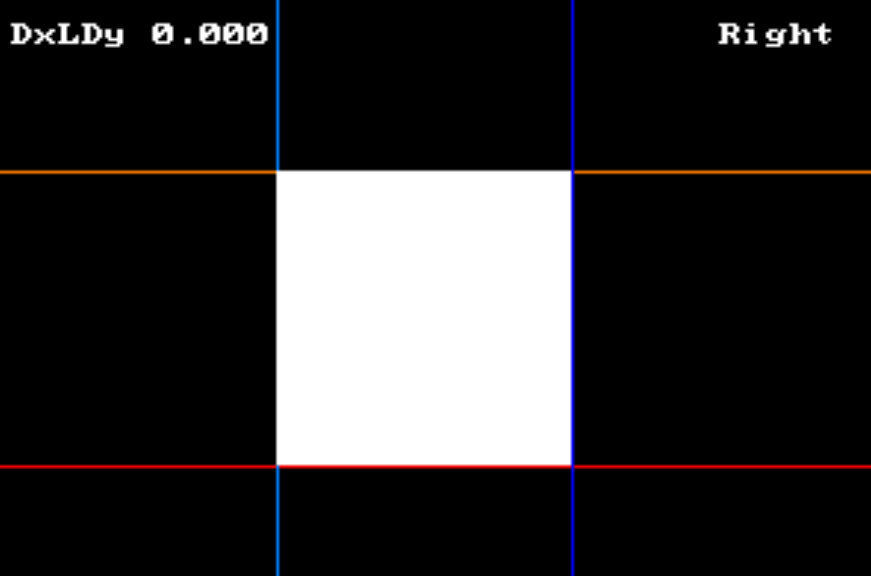 Figure 1 - A rectangle that's actually a triangle
Let’s see how we can draw such a triangle.
We’re going to draw the triangle from top to bottom. Starting at YH and ending at YL. That’s always where the pixels of the triangle are,
a triangle pixel can’t exist before its YH or after its YL. Contrary to this, XH and XL are not the leftmost and rightmost position of the triangle,
instead they are the X positions of the start of the slopes. On right major triangles XH < XL and on left major triangles XL < XH usually. This
is not a hard rule but most triangles you meet will abide by it.
Now we want to go row by row, advance our start X and our end X by their slopes and draw the pixels between the start X and the end X.
And what is YM? YM is a position where before YM, we use the M slope and XM position as our end X, and after YM we use the L slope and XL position as our end X.
Now, here’s a normal triangle:
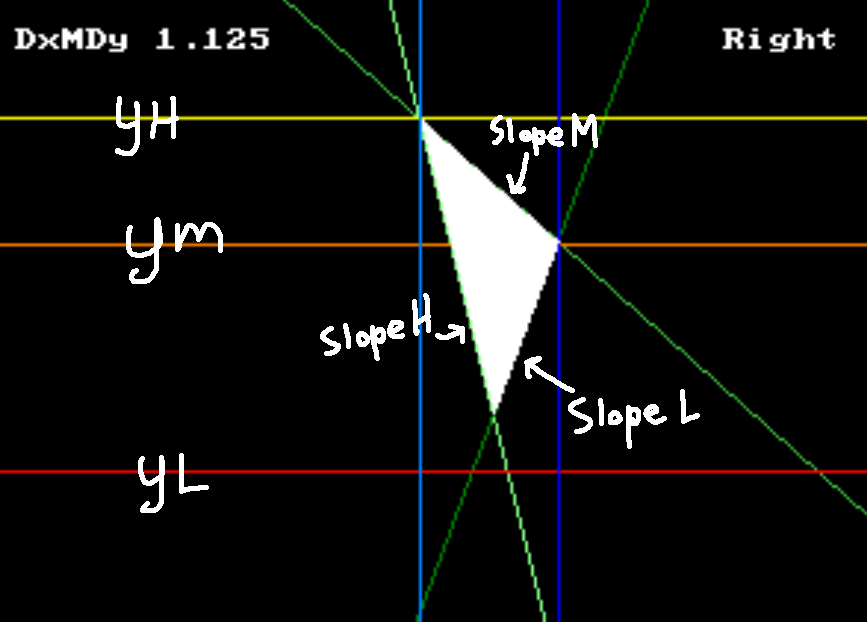 Figure 2 - A normal triangle
Notice how before YM, slope M is used, and after YM, slope L is used? In this example XH and XM are the same (as you can see slope H and slope M start from the same point), but they can be different.
You will also notice that at the point slope H and slope L meet (or M if it met with that), the triangle is stopped, even though we haven’t reached YL yet. This is an important detail, although
you shouldn’t meet such a triangle in a game, the YL would most likely be at the point the two lines meet.
Because of how these triangles are drawn, it is possible to draw 2 different triangles, one before YM and one after YM. The only thing they’ll have in common is the YH slope.
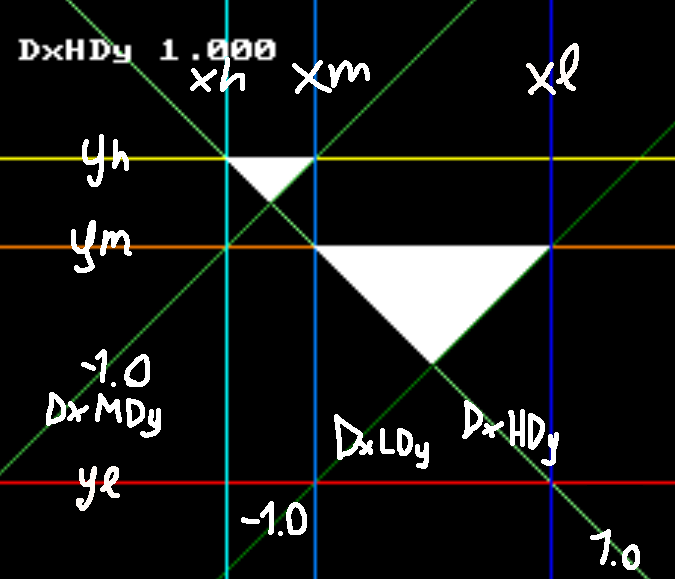 Figure 3 - Two triangles that are actually one triangle
Here’s some example code if the pictures aren’t helping:
Note that things like scissoring, depth testing, texture sampling and shading are missing, and also that this is not a perfect edgewalker implementation that covers every edge case in the N64, but instead one to give you an idea of what’s going on.
int ystart = yh;
int ymiddle = ym;
int yend = yl;

int32_t xstart = xh;
int32_t xend = xm;
int32_t start_slope = slopeh;
int32_t end_slope = slopem;

auto comparison = right_major ? std::function<bool(int, int)>(std::less_equal()) : std::function<bool(int, int)>(std::greater_equal());
int increment = right_major ? 1 : -1;

for (int y = ystart; y <= yend; y++) {
    if (y == ymiddle) [[unlikely]] {
        // we reached the middle point, change
        // our slope and end point
        // note that xstart is left unchanged
        xend = xl;
        end_slope = slopel;
    }
    xstart += start_slope;
    xend += end_slope;
    int xstart_i = xstart >> 16;
    int xend_i = xend >> 16;
    for (int x = xstart_i; comparison(x, xend_i); x += increment) {
        draw_pixel(x, y);
    }
}
Thanks to Kieron and Peach for helping me write this post.